初步了解Windows驱动
微软技术文档:https://docs.microsoft.com/zh-cn/windows-hardware/drivers/
示例KMDF驱动程序:https://docs.microsoft.com/zh-cn/windows-hardware/drivers/wdf/sample-kmdf-drivers
示例UMDF驱动程序:https://docs.microsoft.com/zh-cn/windows-hardware/drivers/wdf/sample-umdf-drivers
编译示例程序
此处以微软提供的最简单的KMDF驱动程序(ECHO,该驱动程序演示了如何使用框架的队列并请求对象和自动同步)为例:
从github上下载微软驱动程序示例:
git clone https://github.com/microsoft/Windows-driver-samples.git
(1) 用Visual Studio 2019打开工程目录Windows-driver-samples\general\echo\kmdf\kmdfecho.sln(安装了Windows SDK及WDK驱动开发工具:
如何安装参考:https://docs.microsoft.com/zh-cn/windows-hardware/drivers/download-the-wdk
在Windows 10下这个仓库生成的驱动安装有问题,未找到原因,可以使用Windows-driver-samples\general\echo\umdf2\umdf2echo.sln,这个工程测试可用。
(2) 64位系统下需要设置编译平台为x64,仓库默认x86,安装会出现失败: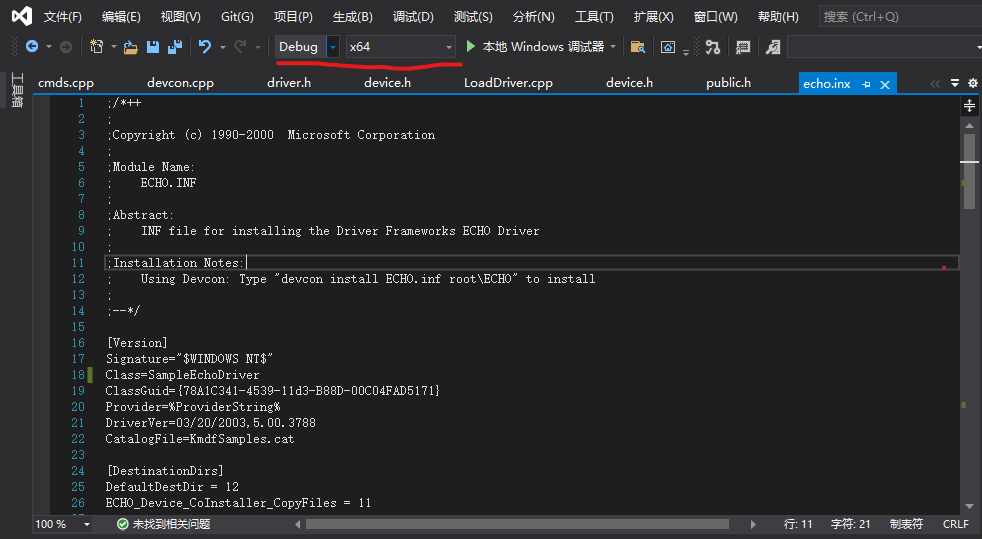
(3) 64位系统下需要对驱动进行签名,不然会无法安装,设置测试签名: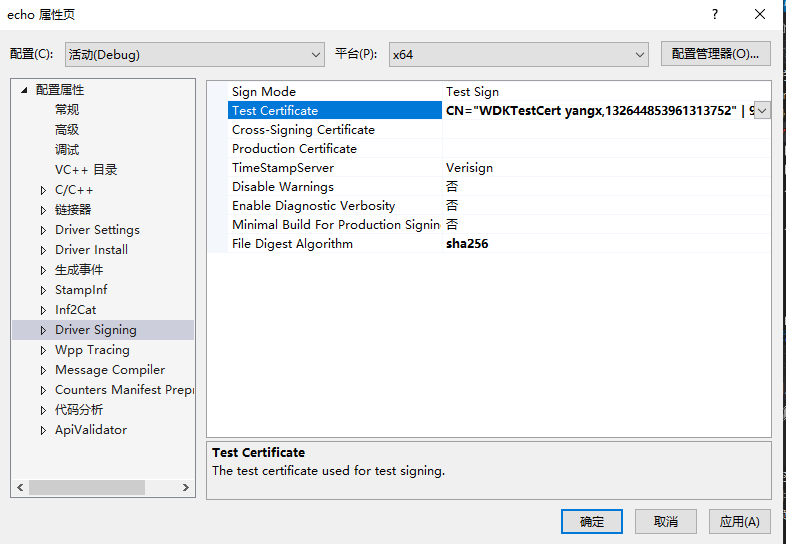
(4) 用Visual Studio 2019打开工程目录Windows-driver-samples\setup\devcon\devcon.sln,编译生成devcon可执行程序。
(5) 管理员权限打开命令行,输入以下命令,即可安装驱动:
devcon.exe install echo.inf root\ECHO
(6) 打开设备管理器,可以看到安装的驱动了:
下图为内核态驱动: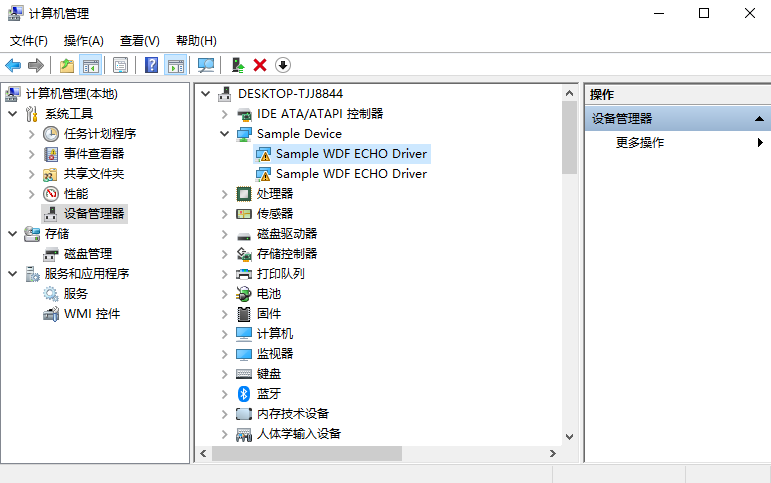
下图为用户态驱动: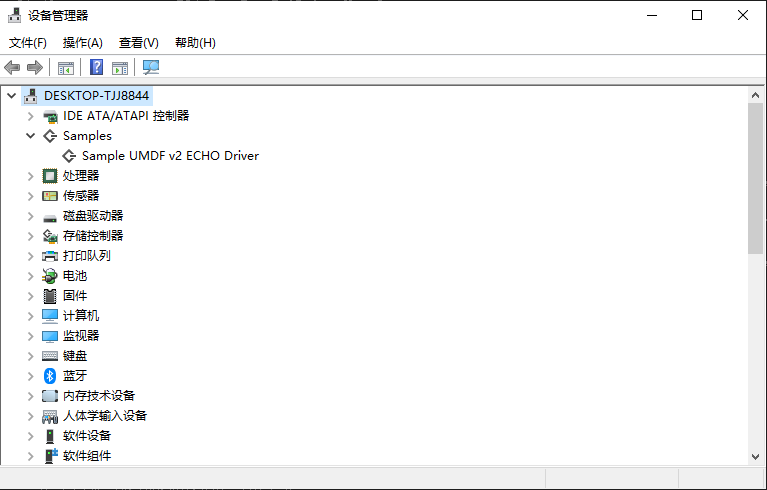
KMDF驱动框架
一个即插即用的驱动程序主要包含:
1、一个DriverEntry例程
2、一个EvtDriverDeviceAdd例程
3、一个或多个I/O队列
4、一个或多个I/O事件回调例程
5、支持即插即用及电源管理的例程
6、支持的WMI回调例程,用于管理计算机系统
7、其他回调例程,如对象的清除、终端处理、DMA等例程
DriverEntry例程
DriverEntry例程负责驱动程序的初始化,是驱动程序的入口,就像可执行程序的main函数一样。所有的驱动程序都包含DriverEntry例程。
DriverEntry例程主要用来创建驱动对象及设置EvtDriverDeviceAdd例程地址:
NTSTATUSDriverEntry(_In_ PDRIVER_OBJECT DriverObject,_In_ PUNICODE_STRING RegistryPath){WDF_DRIVER_CONFIG config;NTSTATUS status;WDF_OBJECT_ATTRIBUTES attributes;WDFDRIVER driver;PDRIVER_CONTEXT driverContext;WPP_INIT_TRACING(DriverObject, RegistryPath);TraceEvents(TRACE_LEVEL_INFORMATION, TRACE_DRIVER, "%!FUNC! Entry");WDF_OBJECT_ATTRIBUTES_INIT(&attributes);attributes.EvtCleanupCallback = ZhouZhenPciDriverKmdfEvtDriverContextCleanup;WDF_DRIVER_CONFIG_INIT(&config,ZhouZhenPciDriverKmdfEvtDeviceAdd);status = WdfDriverCreate(DriverObject,RegistryPath,&attributes,&config,WDF_NO_HANDLE);if (!NT_SUCCESS(status)) {TraceEvents(TRACE_LEVEL_ERROR, TRACE_DRIVER, "WdfDriverCreate failed %!STATUS!", status);WPP_CLEANUP(DriverObject);return status;}TraceEvents(TRACE_LEVEL_INFORMATION, TRACE_DRIVER, "%!FUNC! Exit");return status;}
EvtDriverDeviceAdd 例程
驱动程序初始化后,PnP管理器调用驱动程序的 DeviceAdd 例程来初始化由该驱动程序所控制的设备。在 EvtDriverDeviceAdd 例程中,驱动程序创建一个设备对象作为目标I/O设备,并将设备对象附着在设备堆栈中。
在设备被首次枚举时,DeviceAdd 例程在系统初始化时被调用。当系统运行时,任何时候新设备被枚举,系统都将调用 DeviceAdd 例程。
在KMDF中,DeviceAdd 例程的职责是:创建设备对象,一个或多个I/O队列和设备GUID接口,设置各种事件的回调例程,如即插即用、电源管理、I/O处理等例程。
NTSTATUSKmdfEvtDeviceAdd(_In_ WDFDRIVER Driver,_Inout_ PWDFDEVICE_INIT DeviceInit)/*++Routine Description:EvtDeviceAdd is called by the framework in response to AddDevicecall from the PnP manager. We create and initialize a device object torepresent a new instance of the device.Arguments:Driver - Handle to a framework driver object created in DriverEntryDeviceInit - Pointer to a framework-allocated WDFDEVICE_INIT structure.Return Value:NTSTATUS--*/{NTSTATUS status;WDF_PNPPOWER_EVENT_CALLBACKS pnpPowerCallbacks;WDF_POWER_POLICY_EVENT_CALLBACKS powerPolicyCallbacks;WDF_OBJECT_ATTRIBUTES deviceAttributes;WDFDEVICE device;PFDO_DATA fdoData = NULL;WDFQUEUE queue;WDF_IO_QUEUE_CONFIG queueConfig;WDF_INTERRUPT_CONFIG interruptConfig;UNREFERENCED_PARAMETER(Driver);PAGED_CODE();TraceEvents(TRACE_LEVEL_INFORMATION, TRACE_DRIVER, "%!FUNC! Entry");//// I/O type is Buffered by default. If required to use something else,// call WdfDeviceInitSetIoType with the appropriate type.//// 采用WdfDeviceIoDirect方式WdfDeviceInitSetIoType(DeviceInit, WdfDeviceIoDirect);//// Zero out the PnpPowerCallbacks structure.//// 初始化即插即用和电源管理例程配置结构WDF_PNPPOWER_EVENT_CALLBACKS_INIT(&pnpPowerCallbacks);//// Set Callbacks for any of the functions we are interested in.// If no callback is set, Framework will take the default action// by itself. This sample provides many of the possible callbacks,// mostly because it's a fairly complex sample that drives full-featured// hardware. Drivers derived from this sample will often be able to// provide only some of these.////// These callback is invoked to tear down all the driver-managed state// that is set up in this function. Many times, this callback won't do// much of anything, since many of the things that are set up here will// have their lifetimes automatically managed by the Framework.////// These two callbacks set up and tear down hardware state,// specifically that which only has to be done once.//// 设置即插即用基本例程// EvtDevicePrepareHardware和EvtDeviceReleaseHardware两个例程// 对硬件设备能否获得Windows操作系统分配的资源起着至关重要的作用。// EvtDevicePrepareHardware的任务主要包括获得内存资源、内存物理地址与虚拟地址的映射、I/O端口映射和中断资源分配。pnpPowerCallbacks.EvtDevicePrepareHardware = PciDrvEvtDevicePrepareHardware;pnpPowerCallbacks.EvtDeviceReleaseHardware = PciDrvEvtDeviceReleaseHardware;//// These two callbacks set up and tear down hardware state that must be// done every time the device moves in and out of the D0-working state.//pnpPowerCallbacks.EvtDeviceD0Entry = PciDrvEvtDeviceD0Entry;pnpPowerCallbacks.EvtDeviceD0Exit = PciDrvEvtDeviceD0Exit;//// These next two callbacks are for doing work at PASSIVE_LEVEL (low IRQL)// after all the interrupts are connected and before they are disconnected.//// Some drivers need to do device initialization and tear-down while the// interrupt is connected. (This is a problem for these devices, since// it opens them up to taking interrupts before they are actually ready// to handle them, or to taking them after they have torn down too much// to be able to handle them.) While this hardware design pattern is to// be discouraged, it is possible to handle it by doing device init and// tear down in these routines rather than in EvtDeviceD0Entry and// EvtDeviceD0Exit.//// In this sample these callbacks don't do anything.//// pnpPowerCallbacks.EvtDeviceD0EntryPostInterruptsEnabled = NICEvtDeviceD0EntryPostInterruptsEnabled;// pnpPowerCallbacks.EvtDeviceD0ExitPreInterruptsDisabled = NICEvtDeviceD0ExitPreInterruptsDisabled;//// This next group of five callbacks allow a driver to become involved in// starting and stopping operations within a driver as the driver moves// through various PnP/Power states. These functions are not necessary// if the Framework is managing all the device's queues and there is no// activity going on that isn't queue-based. This sample provides these// callbacks because it uses watchdog timer to monitor whether the device// is working or not and it needs to start and stop the timer when the device// is started or removed. It cannot start and stop the timers in the D0Entry// and D0Exit callbacks because if the device is surprise-removed, D0Exit// will not be called.//pnpPowerCallbacks.EvtDeviceSelfManagedIoInit = PciDrvEvtDeviceSelfManagedIoInit;pnpPowerCallbacks.EvtDeviceSelfManagedIoCleanup = PciDrvEvtDeviceSelfManagedIoCleanup;pnpPowerCallbacks.EvtDeviceSelfManagedIoSuspend = PciDrvEvtDeviceSelfManagedIoSuspend;pnpPowerCallbacks.EvtDeviceSelfManagedIoRestart = PciDrvEvtDeviceSelfManagedIoRestart;//// Register the PnP and power callbacks. Power policy related callbacks will be registered// later.//// 注册即插即用和电源管理例程WdfDeviceInitSetPnpPowerEventCallbacks(DeviceInit, &pnpPowerCallbacks);//// Init the power policy callbacks//WDF_POWER_POLICY_EVENT_CALLBACKS_INIT(&powerPolicyCallbacks);//// This group of three callbacks allows this sample driver to manage// arming the device for wake from the S0 state. Networking devices can// optionally be put into a low-power state when there is no networking// cable plugged into them. This sample implements this feature.//powerPolicyCallbacks.EvtDeviceArmWakeFromS0 = PciDrvEvtDeviceWakeArmS0;powerPolicyCallbacks.EvtDeviceDisarmWakeFromS0 = PciDrvEvtDeviceWakeDisarmS0;powerPolicyCallbacks.EvtDeviceWakeFromS0Triggered = PciDrvEvtDeviceWakeTriggeredS0;//// This group of three callbacks allows the device to be armed for wake// from Sx (S1, S2, S3 or S4.) Networking devices can optionally be put// into a state where a packet sent to them will cause the device's wake// signal to be triggered, which causes the machine to wake, moving back// into the S0 state.//powerPolicyCallbacks.EvtDeviceArmWakeFromSx = PciDrvEvtDeviceWakeArmSx;powerPolicyCallbacks.EvtDeviceDisarmWakeFromSx = PciDrvEvtDeviceWakeDisarmSx;powerPolicyCallbacks.EvtDeviceWakeFromSxTriggered = PciDrvEvtDeviceWakeTriggeredSx;//// Register the power policy callbacks.//WdfDeviceInitSetPowerPolicyEventCallbacks(DeviceInit, &powerPolicyCallbacks);// Since we are the function driver, we are now the power policy owner// for the device according to the default framework rule. We will register// our power policy callbacks after finding the wakeup capability of the device.//// Specify the context type and size for the device we are about to create.//WDF_OBJECT_ATTRIBUTES_INIT_CONTEXT_TYPE(&deviceAttributes, FDO_DATA);deviceAttributes.SynchronizationScope = WdfSynchronizationScopeDevice;status = ZhouZhenPciDriverKmdfCreateDevice(DeviceInit);if (!NT_SUCCESS(status)) {TraceEvents(TRACE_LEVEL_ERROR, TRACE_DRIVER,"WdfDeviceInitialize failed %!STATUS!\n", status);return status;}//// If our device supports wait-wake then we will set our power-policy and// update S0-Idle policy.///*if (IsPoMgmtSupported(fdoData)) {TraceEvents(TRACE_LEVEL_INFORMATION, TRACE_DRIVER,"Device has wait-wake capability\n");status = PciDrvSetPowerPolicy(fdoData);if (!NT_SUCCESS(status)) {TraceEvents(TRACE_LEVEL_ERROR, TRACE_DRIVER,"PciDrvSetPowerPolicy failed %!STATUS!\n", status);return status;}}*/TraceEvents(TRACE_LEVEL_INFORMATION, TRACE_DRIVER, "%!FUNC! Exit");return status;}
I/O处理例程
I/O处理例程处理应用程序与驱动程序之间的通信,包括Create、Close、CleanUp、Read、Write、DeviceContrl等。
对于Read、Write、DeviceControl的I/O请求,是由队列来管理的,可以是默认队列,也可以是自己创建的队列,队列可以是一个,也可以是多个,可以串行处理,也可以并行处理。
NTSTATUSZhouZhenPciDriverKmdfQueueInitialize(_In_ WDFDEVICE Device)/*++Routine Description:The I/O dispatch callbacks for the frameworks device objectare configured in this function.A single default I/O Queue is configured for parallel requestprocessing, and a driver context memory allocation is createdto hold our structure QUEUE_CONTEXT.Arguments:Device - Handle to a framework device object.Return Value:VOID--*/{WDFQUEUE queue;NTSTATUS status;WDF_IO_QUEUE_CONFIG queueConfig;PAGED_CODE();//// Configure a default queue so that requests that are not// configure-fowarded using WdfDeviceConfigureRequestDispatching to goto// other queues get dispatched here.//WDF_IO_QUEUE_CONFIG_INIT_DEFAULT_QUEUE(&queueConfig,WdfIoQueueDispatchParallel);queueConfig.EvtIoDeviceControl = ZhouZhenPciDriverKmdfEvtIoDeviceControl;queueConfig.EvtIoStop = ZhouZhenPciDriverKmdfEvtIoStop;queueConfig.EvtIoRead = ZhouZhenPciDriverKmdfEvtIoRead;queueConfig.EvtIoWrite = ZhouZhenPciDriverKmdfEvtIoWrite;status = WdfIoQueueCreate(Device,&queueConfig,WDF_NO_OBJECT_ATTRIBUTES,&queue);if(!NT_SUCCESS(status)) {TraceEvents(TRACE_LEVEL_ERROR, TRACE_QUEUE, "WdfIoQueueCreate failed %!STATUS!", status);return status;}return status;}
驱动程序调试
微软提供了可以调试驱动程序的工具 TraceView,该工具安装在WDK的安装路径下(默认路径:C:\Program Files (x86)\Windows Kits\10\Tools\x64),具体调试步骤如下:
1、以管理员权限打开 TraceView:界面如下: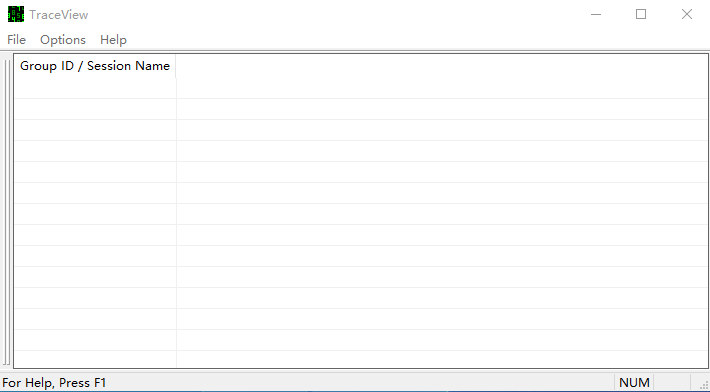
2、点击“File/Create new log session”,选择“PDB(Debug Infomation)File”,选择驱动程序的符号文件(.pdb后缀的文件):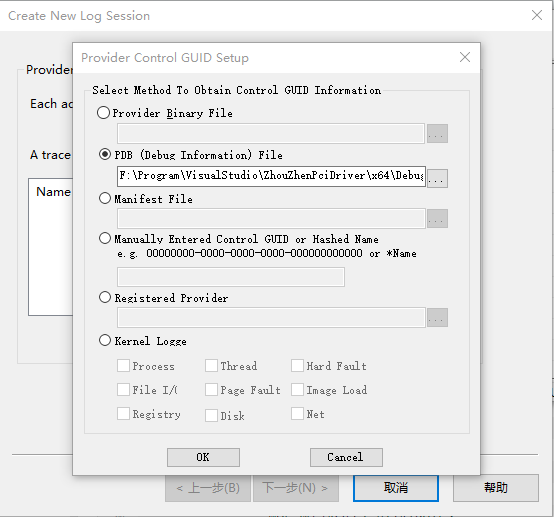
3、然后点击“OK”、“下一步”,创建一个调试session,如下: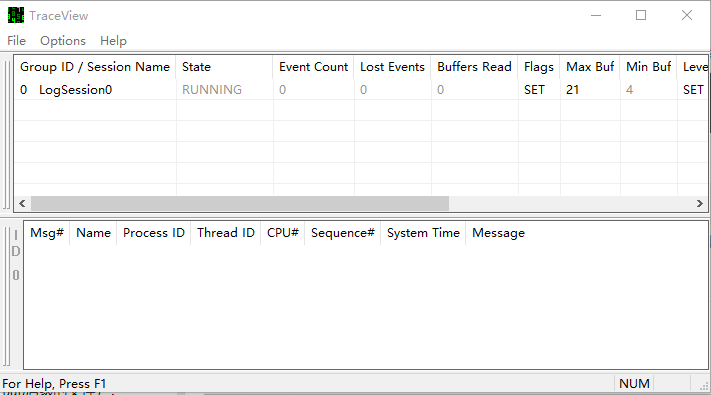
4、这时候就可以调试了,如执行安装驱动命令“devcon install echo.inf root\ECHO”,可以看到调试日志: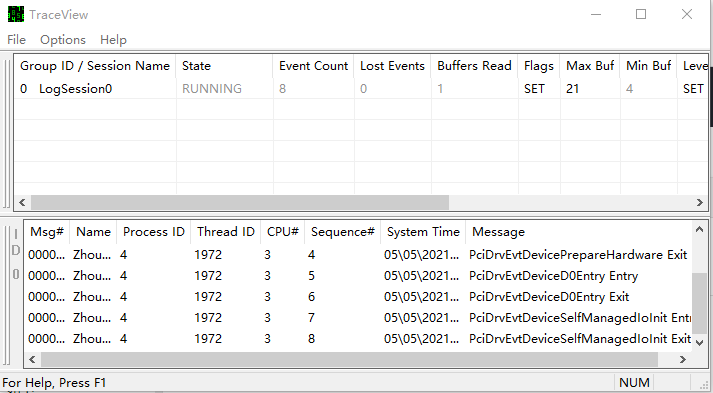
生成测试证书
1、打开系统的testsigning模式,使得非权威CA发放的签名可以使用
2、做一个签名证书出来
3、把证书加进本机信任根CA中去
4、给驱动签名。
bcdedit /set testsigning onMakeCert –r –pe –ss PrivateCertStore –n CN=www.aisoftcloud.cn(test) test.cerCertMgr -add test.cer -s -r localMachine rootSigntool sign /v /s PrivateCertStore /n www.aisoftcloud.cn(test) /t http://timestamp.verisign.com/scripts/timestamp.dll echo.sys
Visual Studio 2019开发环境可通过设置下面参数进行签名,编译后使用“devcon install”命令重新安装驱动即可: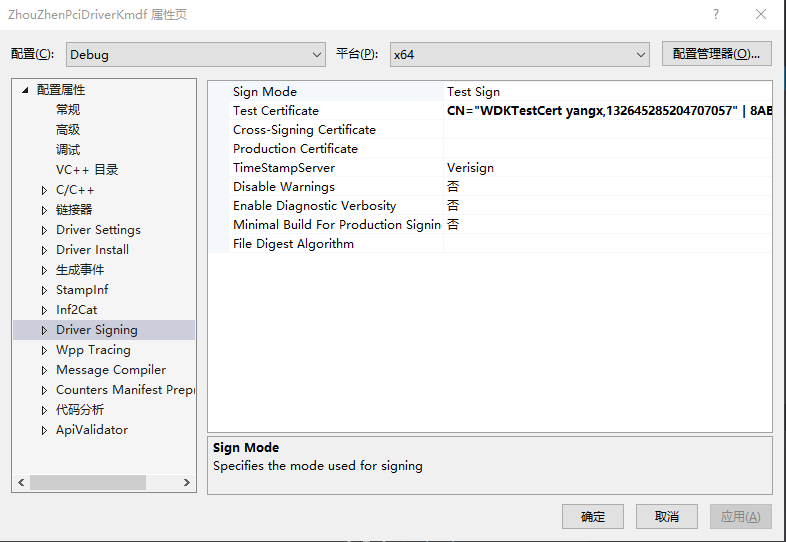
参考文章
Windows-driver-samples/general/pcidrv/
PnPUtil (PnPUtil.exe) 是一个命令行工具,使管理员可以执行以下操作驱动程序包

